Now that you know how to get to every trailhead in the region, let’s talk more about the actual treks - what the overall route, different sections, trekking distances, time required, elevation gain, highest elevation, and route condition are like.
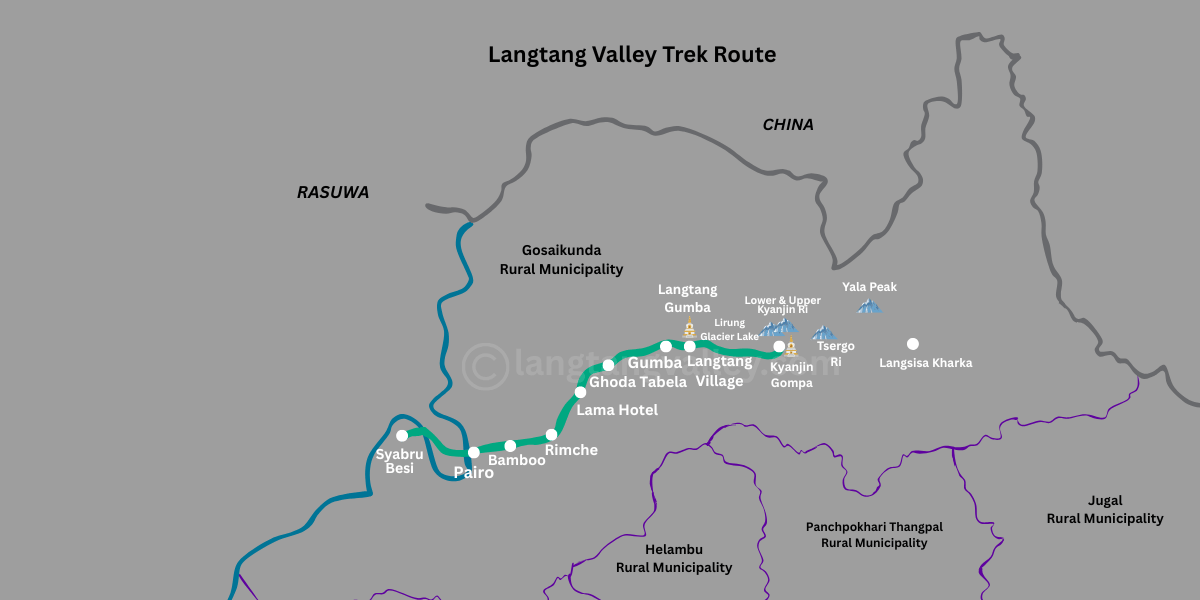
Langtang Valley Route
The Langtang Valley route provides the best of all worlds. Compared to the rest of the region, it has good hotels and food options, good cell network and electricity, good amount of forests and remote areas for wildlife, decent cultural immersion, and excellent mountain views/proximity.
For this trek, most people start in Syabrubesi and climb up via one of two routes:
Via Syabrubesi - Domen (Standard Route)
|
Route Section
|
Distance
|
Approx. Time
|
Elevation Gain/Loss
|
Route Description
|
|
Syabru (1,467 m) → Domen (1,565 m)
|
3.5 km
|
1 - 1.5 hrs
|
98 m ↑
|
Vehicle road + riverside hill trail
|
|
Domen → Rimche (2,495 m)
|
6 km
|
3 - 4 hrs
|
930 m ↑
|
Forest trail
|
|
Rimche → Lama Hotel (2,515 m)
|
1 km
|
20 - 30 mins
|
20 m ↑
|
Thick forest trail along the river
|
|
Lama Hotel → Woodland or Chunama (2,800 m approx.)
|
3 km
|
2 - 2.5 hrs
|
285 m ↑
|
Thick forest trail along the river
|
|
Woodland or Chunama → Ghodatabela (3,008 m)
|
2.7 km
|
1.5 - 2 hrs
|
208 m ↑
|
Thick forest trail along the river
|
|
Ghodatabela → Thangshyap (3,140 m)
|
2 km
|
1 - 1.5 hrs
|
132 m ↑
|
Open valley + riverside trail
|
|
Thangshyap → Langtang Village (3,455 m)
|
4 km
|
1.5 - 2 hrs
|
315 m ↑
|
Open valley + riverside trail
|
|
Langtang → Kyanjin Gompa (3,890 m)
|
6.6 km
|
3 - 4 hrs
|
435 m ↑
|
Most scenic part of the trek
|
From Kyanjin, you can hike to whichever major attraction or viewpoint you prefer and come back to the hotel for the night. The one-way time, distance and elevation to different spots look like this:
|
Viewpoint / Point of Interest
|
Distance from Kyanjin Gompa
|
Approx. Time
|
Elevation Gain/Loss
|
Route Description
|
|
Lirung Lake (3,960 m approx.)
|
1.5 km
|
30 - 60 mins
|
70 m ↑
|
Gentle hike up to the glacial lake
|
|
Lower Kyanjin Ri (4,400 m)
|
1 km
|
1 - 2 hrs
|
440 m ↑
|
Hike up a hill to a sunrise/sunset viewpoint
|
|
Upper Kyanjin Ri (4,700 m)
|
2 km
|
3 hrs
|
740 m ↑
|
Continue along the ridge to a higher viewpoint
|
|
Tserko Ri (4,985 m)
|
4.5 km
|
5 - 6 hrs
|
1105 m ↑
|
Steep uphill hike to the highest popular viewpoint
|
|
Langshisha Kharka (4,050 m)
|
12 km
|
5 - 7 hrs
|
90 m ↑
|
Flat hike to remote alpine meadows
|
|
Numthang
|
9 km
|
5 hrs
|
50 m ↑
|
Same flat route as Langshisha Kharka
|
|
Morimoto BC
|
6 km
|
4 - 5 hrs
|
730 m ↑
|
Slow ascent on glaciers, this hike starts from Langshisha Kharka, not Kyanjin
|
|
Langtang Lirung Base Camp
|
4 km
|
2 - 3 hrs
|
520 m ↑
|
Slow uphill hike right under Langtang Lirung peak
|
|
Langtang Lirung Glacier Viewpoint
|
3 km
|
2 hrs
|
281 m ↑
|
Slow uphill between Langtang Lirung and the Kyanjin Ri ridge
|
Via Sherpagaon (High Route)
Alternatively, you can also take the scenic route via Sherpagaon. You can take a jeep up to Sherpagaon and do the same when returning. Alternatively, if you are feeling adventurous, you can reach Sherpagaon on foot, but you'll need an extra day and will have more time to explore the area.
|
Route Section
|
Distance
|
Approx. Time
|
Elevation Gain/Loss
|
Route Description
|
|
Syabru → Sherpagaon (2,563 m)
|
10 km
|
5 - 7 hrs
|
1096 m ↑
|
Steep uphill on vehicle road + trekking trail
|
|
Sherpagaon → Rimche (2,495 m)
|
3 km
|
2 hrs
|
68 m ↓
|
Slight downhill on hillside trail
|
After Rimche, the route is the same as in the previous table.
Tamang Heritage Route
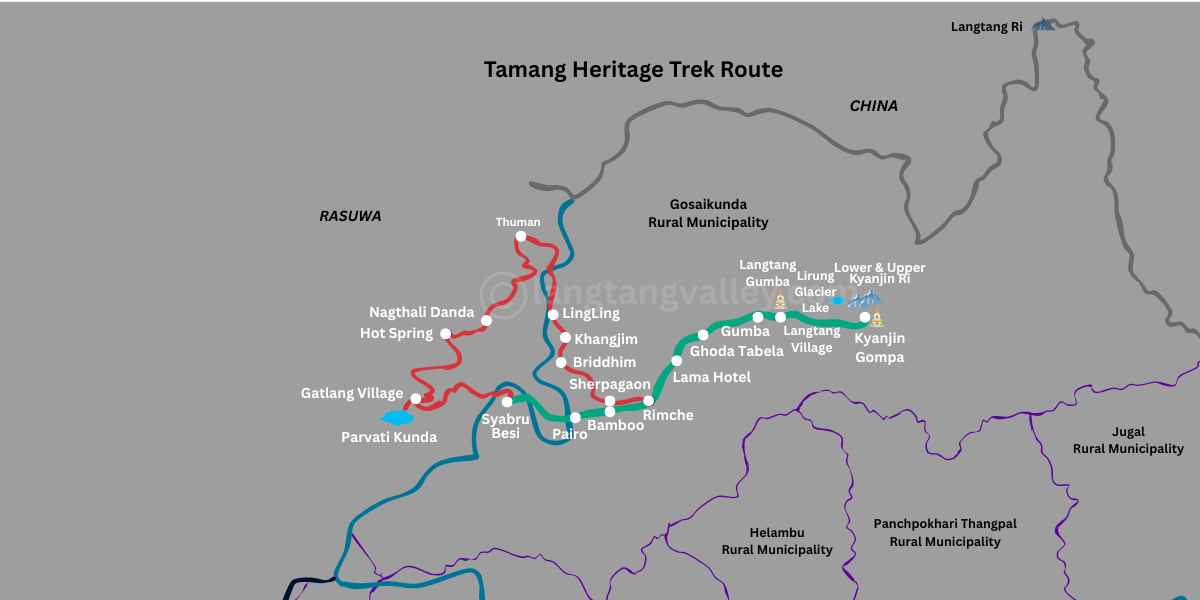
The Tamang Heritage trail is typically done before Langtang valley to experience more of the cultural side of the region and help acclimatize for the upcoming trek. It starts from Syabrubesi like so:
|
Route Section
|
Distance
|
Approx. Time
|
Elevation Gain/Loss
|
Route Description
|
|
Syabru (1,467 m) → Gatlang (2,238 m)
|
14 km
|
4.5 hrs
|
771 m ↑
|
Motorable road
|
|
Gatlang → Tatopani (2,607 m)
|
11 km
|
5 hrs
|
369 m ↑
|
Road + walking up hills
|
|
Tatopani → Thuman (2,338 m)
|
7.7 km
|
5 hrs
|
269 m ↓
|
Uphill to viewpoint at 3,200 m or 3,800 m, then downhill to Thuman
|
|
Thuman → Briddhim (2,229 m)
|
5.5 km
|
2.5 hrs
|
109 m ↓
|
Hillwalking + forest trails
|
|
Briddhim → Lama Hotel (2,515 m)
|
14 km
|
8 - 9 hrs
|
286 m ↑
|
Hillwalking + forest trails
|
From Briddhim, you can head to Lama Hotel to continue with the Langtang Valley trek. Or, you can return to Syabru directly if that’s your plan.
Gosaikunda Trek Route
Besides being a very important religious trail for locals, the Gosainkunda trek is special in that it can be done from 4 different locations.
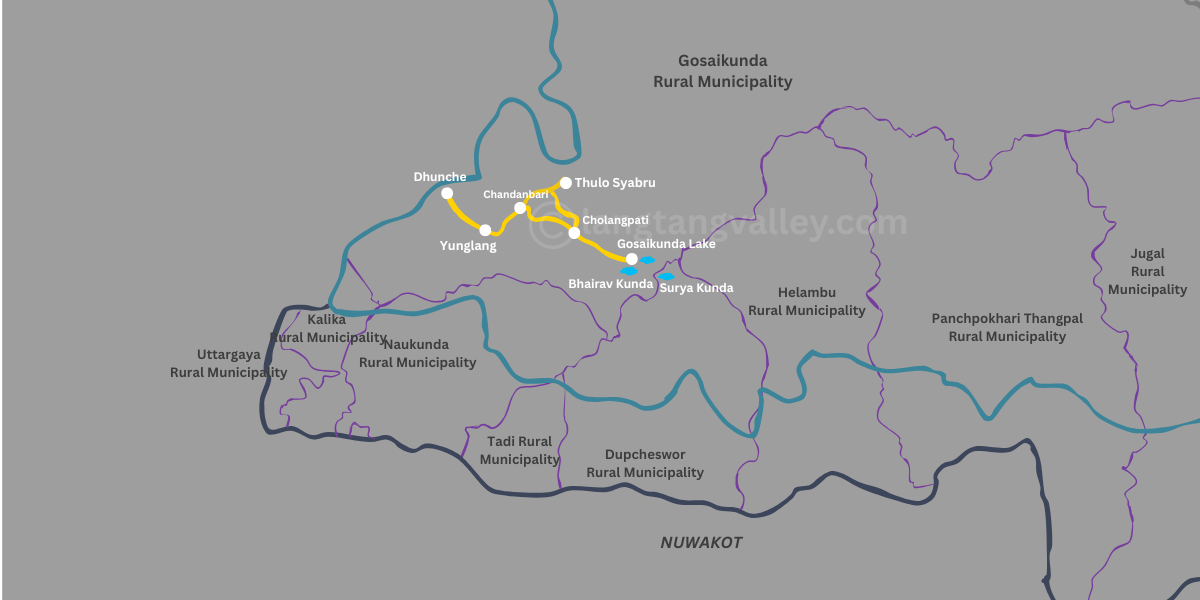
Via Dhunche
The standard route for a Gosainkunda-only trek starts from Dhunche:
|
Route Section
|
Distance
|
Approx. Time
|
Elevation Gain/Loss
|
Route Description
|
|
Dhunche (1,960 m) → Deurali (2,662 m)
|
5.4 km
|
2.5 - 3 hrs
|
702 m ↑
|
Uphill along forest trail + waterfall
|
|
Deurali → Dhimsa (3,030 m)
|
1.1 km
|
1 hr
|
368 m ↑
|
Uphill through forest
|
|
Dhimsa → Chandanbari (3,250 m)
|
1.2 km
|
1 hr
|
220 m ↑
|
Uphill forest trail
|
|
Chandanbari → Cholangpati (3,584 m)
|
3.8 km
|
2 - 3 hrs
|
284 m ↑
|
Thick forest trail
|
|
Cholangpati - Lauribina (3,910 m)
|
1.5 km
|
1.5 hrs
|
326 m ↑
|
Uphill via stairs
|
|
Lauribina → Buddhamandir (4,245 m)
|
1.4 km
|
1.5 -2 hrs
|
335 m ↑
|
Uphill via exposed ridge
|
|
Buddhamandir → Gosainkunda (4,380 m)
|
3 km
|
3 - 4 hrs
|
135 m ↑
|
Uphill on ridge and hillside
|
|
Gosainkunda → Suryakunda (4,610 m)
|
2.6 km
|
2 - 2.5 hrs
|
230 m ↑
|
Slow uphill along alpine lakes
|
Via Thulo Syabru
If you’re combining this trek with other treks in the region (usually Langtang Valley), you’ll enter the Gosainkunda route from Thulo Syabru to Cholangpati. So, first get to Thulosyabru like so:
|
Route Section
|
Distance
|
Approx. Time
|
Elevation Gain/Loss
|
Route Description
|
|
Syabrubesi (1,467 m) → Thulo Syabru (2,250 m)
|
5 km
|
2.5 - 3 hrs
|
783 m ↑
|
Road + forest trail
|
|
OR, Pairo (1,722 m) → Thulo Syabru (2,250 m)
|
4.2 km
|
2.5 - 3 hrs
|
528 m ↑
|
Forest trail
|
|
Thulo Syabru → Mukharka (2,710 m)
|
3.8 km
|
3 hrs
|
460 m ↑
|
Thick forest trail
|
|
Mukharka → Cholangpati (3,584 m)
|
2.7 km
|
3 hrs
|
874 m ↑
|
Thick forest trail
|
After you reach Cholangpati, the route is the same as the previous one.
Via Sundarijal
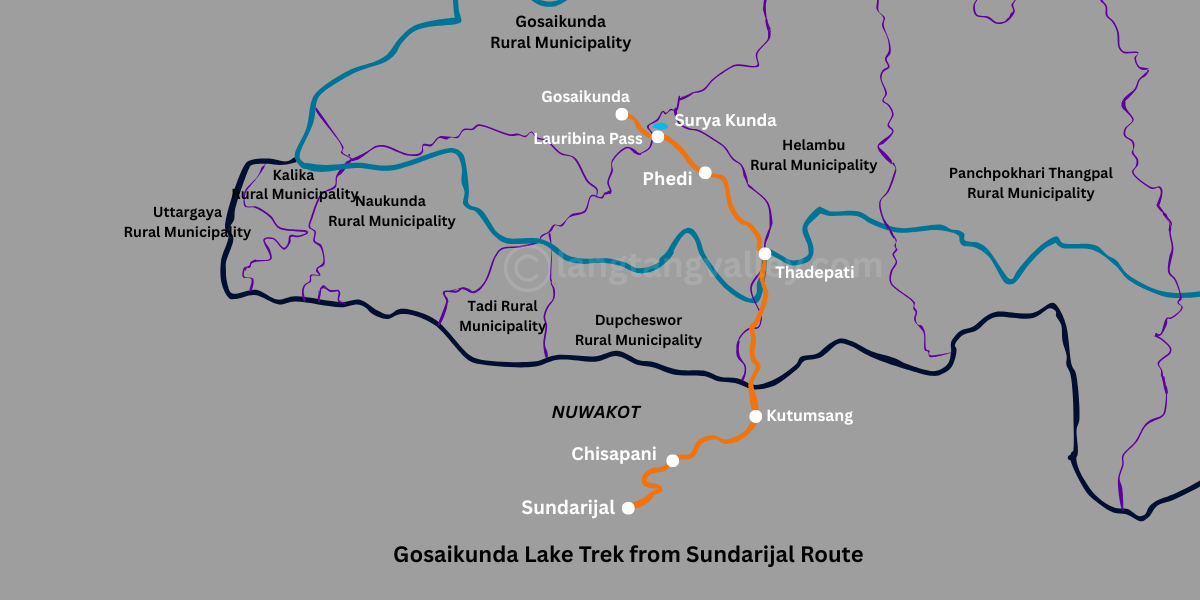
This is a classic alternative route where you start trekking right from Kathmandu. It’s good for avoiding the long highway drive and mainstream crowds and gives you good views and cultural experiences of the Helambu region.
|
Route Section
|
Distance
|
Approx. Time
|
Elevation Gain/Loss
|
Route Description
|
|
Sundarijal (1,385 m) → Chisapani (2,165 m)
|
10 km
|
3 - 4 hrs
|
780 m ↑
|
Mix of forest and road trails
|
|
Chisapani → Kutumsang (2,470 m)
|
18 km
|
7 - 8 hrs
|
305 m ↑
|
Forest + road trails
|
|
Kutumsang → Thadepati (3,690 m)
|
11 km
|
7 - 8 hrs
|
1220 m ↑
|
Forest + road trails
|
|
Thadepati → Phedi (3,730 m)
|
8 km
|
8 hrs
|
40 m ↑
|
Forest + ridge trails
|
|
Phedi → Lauribina Pass / Suryakunda (4,610 m)
|
4 km
|
5 hrs
|
880 m ↑
|
Steep ridge trail
|
|
Lauribina Pass → Gosainkunda (4,380 m)
|
2.4 km
|
1.5 hrs
|
230 m ↓
|
Downhill trail surrounded by alpine lakes
|
Via Dupcheshwor
With this route, you pass through the beautiful valleys and villages of Nuwakot district and reach all the way to Talu village via public or private vehicles. This is the shortest trekking route, but you need to handle the logistics well to reach Talu.
|
Route Section
|
Distance
|
Approx. Time
|
Elevation Gain/Loss
|
Route Description
|
|
Talu (2,525 m) → Phedi (3,730 m)
|
4.2 km
|
4 - 5 hrs
|
1195 m ↑
|
Steep uphill on a forest trail
|
After Phedi, it's the same route as the Sundarijal route from above - a simple uphill.
You might’ve also noticed that this route is short (i.e. the elevation gain is very fast and steep). So, good acclimatization is a must for safety.
Generally, this route is better suited for a quick descent rather than climbing up.
Helambu Circuit Route
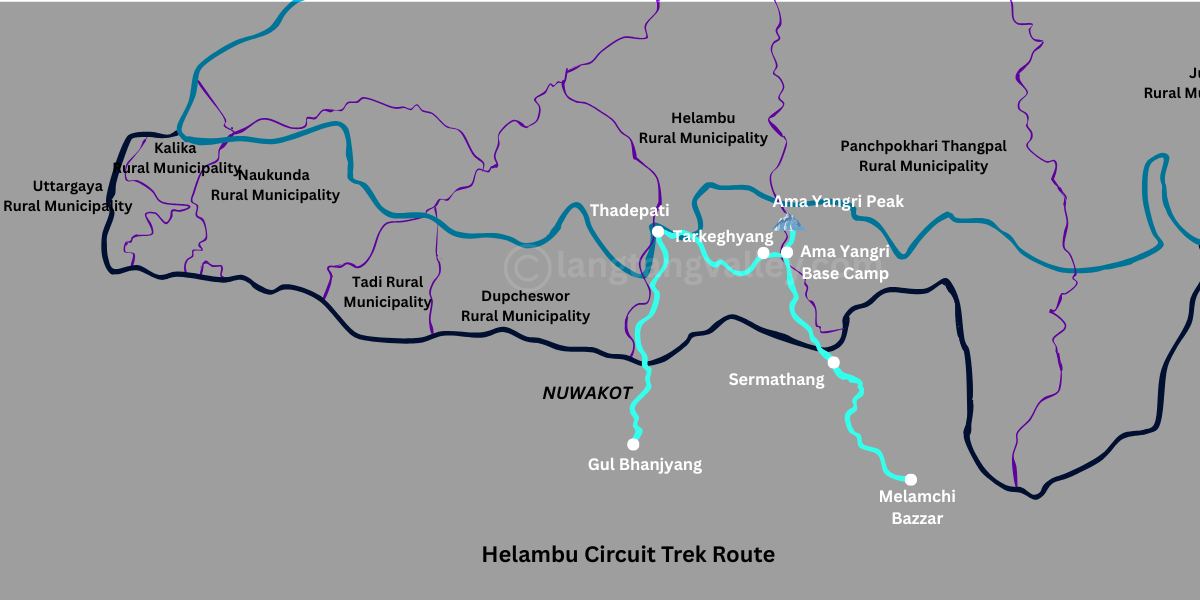
The Helambu circuit takes you through traditional Hyolmo villages up to one of the best viewpoints in the region - Ama Yangri. The trek starts from Sundarijal like so:
|
Route Section
|
Distance
|
Approx. Time
|
Elevation Gain/Loss
|
Route Description
|
|
Sundarijal (1,385 m) → Chisapani (2,165 m)
|
10 km
|
3 - 4 hrs
|
780 m ↑
|
Mix of forest and road trails
|
|
Chisapani → Gul Bhanjyang (2,495 m)
|
15 km
|
5 - 6 hrs
|
330 m ↑
|
Forest + road trails
|
|
Gul Bhanjyang → Thadepati (3,690 m)
|
14 km
|
9 hrs
|
1195 m ↑
|
Forest + road trails
|
|
Thadepati → Tarke Ghyang (2,600 m)
|
9.7 km
|
4.5 - 5 hrs
|
1090 m ↓
|
Downhill to 1,900 m, then uphill to 2,600 m
|
|
Tarke Ghyang → Ama Yangri Base Camp (3,200 m)
|
2 km
|
2 hrs
|
600 m ↑
|
Uphill on road + hillside + forest
|
|
Base Camp → Ama Yangri Peak (3,772 m)
|
2 km
|
2 hrs
|
572 m ↑
|
Forest + stairs climb
|
|
Ama Yangri → Tarke Ghyang
|
4 km
|
2 hrs
|
1172 m ↓
|
Downhill return trek
|
|
Tarke Ghyang → Sermathang (2,590 m)
|
11 km
|
5 hrs
|
10 m ↓
|
Road + forest trail
|
|
Sermathang → Melamchi Bazaar (870 m)
|
17 km
|
7 - 8 hrs
|
1720 m ↓
|
Downhill to end point of trek
|
Panch Pokhari Lake Trek Route
The Panchpokhari trek is a very underrated route that takes you to 5 holy lakes at 4,100 m. It’s very popular for blooming wildflowers during monsoon.
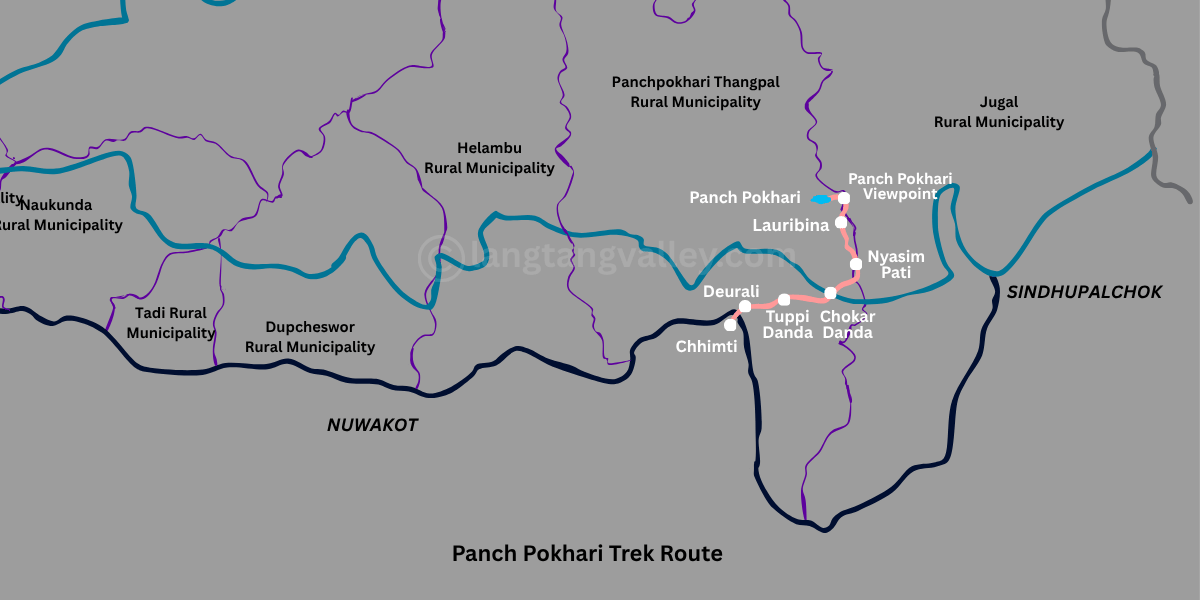
Once you get from Kathmandu to Chhimti, the trail looks like this:
|
Route Section
|
Distance
|
Approx. Time
|
Elevation Gain/Loss
|
Route Description
|
|
Chhimti (1,893 m) → Deurali (2,105 m)
|
1.4 km
|
1 hr
|
212 m ↑
|
Uphill on road + stairs, bridge crossing, waterfall
|
|
Deurali → Tuppi Danda (2,400 m)
|
3.7 km
|
2 hrs
|
295 m ↑
|
Quiet forest trail
|
|
Tuppi Danda → Rato Mato (3,115 m)
|
4 km
|
3 hrs
|
715 m ↑
|
Uphill through a forest
|
|
Rato Mato → Chokar Danda (3,240m)
|
1 km
|
1 hr
|
125 m ↑
|
Uphill to a viewpoint
|
|
Chokar Danda → Nosyampati (3,700 m)
|
2.2 km
|
2 hrs
|
460 m ↑
|
Uphill to the last settlement before Panchpokhari
|
|
Nosyampati → Lauribina (4,015 m)
|
4.1 km
|
4 hrs
|
315 m ↑
|
Steep uphill on hillside and stairs
|
|
Lauribina → Panchpokhari (4,100 m)
|
700 m
|
30 mins
|
85 m ↑
|
Short final section to reach the lakes
|
|
Panchpokhari → Viewpoint (4,220m)
|
1 km
|
1 hr
|
120 m ↑
|
Short climb up to the viewpoint ridge
|
Jugal Base Camp Route
The Jugal Himal Base Camp trek is the newest and most untouched route in the region. If you’re tired of commercialized treks and want something raw and wild, this is where you should look.
As I mentioned earlier, jeeps usually go up to Tembathang. After that, the trek looks like this:
|
Route Section
|
Distance
|
Approx. Time
|
Elevation Gain/Loss
|
Route Description
|
|
Tembathang (2,200 m) → Chhendang (2,636 m)
|
8.7 km
|
4.5 - 5 hrs
|
436 m ↑
|
Trek through villages, road, and hillsides
|
|
Chhendang → Ne Pemachal (3,500 m)
|
7 km
|
6 hrs
|
864 m ↑
|
Remote forest trail
|
|
Ne Pemachal → Bumba Sherpu (4,200 m)
|
1.2 km
|
2 hrs
|
700 m ↑
|
Forest opens up into alpine pasture and glacial moraine
|
|
Bumba Sherpu → Base Camp (4,700 m)
|
1.2 km
|
2 - 2.5 hrs
|
500 m ↑
|
Last stretch to the base camp
|
More Trips in and Around Langtang Region
I’ve described the main Langtang region trekking routes so far, which are good to start with.
But if you’re an experienced hiker and want to experience more of the region, there are plenty of side trips and combo routes for you to explore.
Yala Peak
A 2 day camping trip from Kyanjin Gompa to the highest trekking peak in the region - Yala Peak South (5,520 m). An excellent addition to the standard Langtang Valley route if you want the best views of the region.
You either climb to Tserko Ri, or close to it, then hike for a few more hours to reach Yala Base Camp. You rest there for the night and summit the peak early the next morning.
Langshisha Kharka
A 1 day round trip east of Kyanjin Gompa to remote alpine pastures. With just 10 km of flat and easy hiking, you’re far away from the main trails and encounter a lot more Himalayan wildlife. It can also be done as a camping trip.
Morimoto Base Camp
An extra day of hiking on glacial moraines gets you from Langshisha Kharka to Morimoto BC.
This area is used as a base camp for peaks in the region like Gurkarpo Ri, Ramthang Karpo Ri,, Bhemdang Ri (Morimoto Peak), etc. Due to its remoteness, it’s also an excellent area for wildlife spotting.
Tilman Pass (5,350 m)
A technical mountain pass on the Great Himalaya Trail (GHT) that connects the Panchpokhari trek to Langtang Valley or vice versa. It requires 2-4 days of remote camping as there are no hotels near the pass.
This can only be done during good weather with necessary equipment and local guides. Otherwise, it’s too difficult and risky due to deep snow, rockfall, icy patches, navigation difficulty, etc.
Ganja La Pass (5,180 m)
This is another technical mountain pass that connects Kyanjin Gompa to the Helambu Circuit. I don’t recommend the opposite way (Helambu to Kyanjin) as it’s more difficult/risky.
Like Tilman pass, this requires good weather, equipment, and local guides. The route itself is interesting as you pass Ghasa Hill and Naya Kanga High Camp on the way to the pass while enjoying spectacular views of the region.
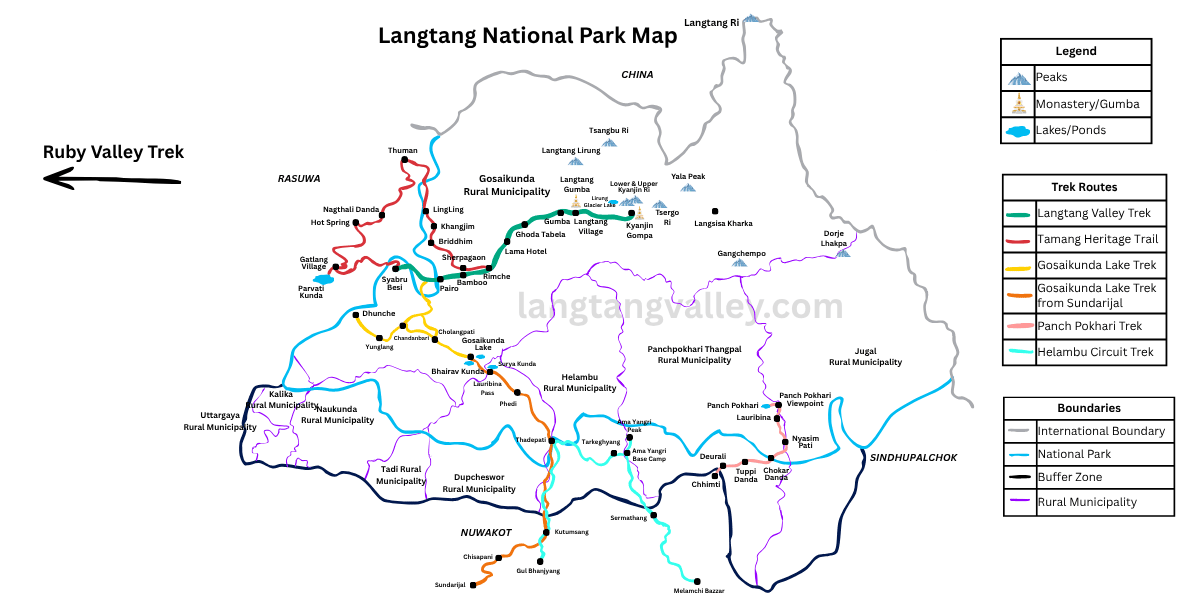
Ruby Valley Route [Very Popular]
Ruby Valley actually lies in the buffer zone between Langtang and the Manaslu Conservation Area. So, most of this trek is NOT located inside the Langtang National Park. But because it starts from Syabrubesi, it’s usually discussed along with actual Langtang region treks. Here’s what the route looks like:
|
Route Section
|
Distance
|
Approx. Time
|
Elevation Gain/Loss
|
Route Description
|
|
Syabrubesi (1,467 m) → Gatlang (2,238 m)
|
14 km
|
4.5 hrs
|
771 m ↑
|
Trek through local villages with mountain views
|
|
Gatlang → Somdang (3,270 m)
|
16 km
|
5 - 7 hrs
|
1032 m ↑
|
Forest trail, alpine lake
|
|
Somdang → Tipling (2,100 m)
|
13 km
|
8-10 hrs
|
1170 m ↓
|
Long day with high pass crossing at 3,800 m
|
|
Tipling → Chalish (1,933 m)
|
3.3 km
|
1.5 hrs
|
167 m ↓
|
Short downhill through a forest and river
|
|
Chalish → Darkha Gaon (1,647 m)
|
20 km
|
7 - 8 hrs
|
286 m ↓
|
Downhill through Gurung and Tamang villages
|
|
Darkha Gaon → Darkha Phedi (1,349 m)
|
2.8 km
|
1 hr
|
298 m ↓
|
Final stretch to the exit point
|
Ganesh Himal Base Camp
This is a 3 day excursion on the Ruby Valley route that takes you to the Kalo and Seto daha (Black and White lakes) and the Ganesh Himal Base Camp.
It’s a popular attraction for locals from nearby but remains mostly undiscovered by the outside world (even Nepalis from outside the region).
Quick Tip: This section was only a short intro to less-known routes in the Langtang region. For complete details on all of these, please check out the individual package pages on our site.
Bhairabkunda Lake
You can visit Bhairabkunda lake as a standalone trip in the Gaurishankar Conservation Area. Or, you can explore both the Langtang and Gaurishankar regions by combining Bhairabkunda with the Jugal Himal trek.
This latter route is part of the GHT. You’ll finish the Jugal Base Camp section, then trek through Dipu > Tembathang > Kyangsing > Chhagam > Bagam > Chokarmokar.
The last stretch to the lake is just 1-2 hours on stairs. You’ll pass many small villages, so it’s easy to hop on passing vehicles and skip most of the hiking (for a reasonable fee, of course).
You’ll experience 5 major ecological zones in the Langtang region:
Tropical zone (Under 1000m)
This low altitude zone constitutes a very small area of the Langtang National Park. You’ll pass a few such spots with Sal trees on the highway drive to Dhunche or Syabrubesi. No trekking here; the trekking routes are located higher up.
Subtropical zone (1000-2000m)
Most treks start in the subtropical elevation, which is dominated by forests of Sal, Salla, Chilaune, Uttis, etc. and home to rhesus monkeys, macaques, langurs, etc. This zone remains warm and humid for most of the year. It’s typical to come across some vehicle roads when trekking between villages.
Temperate zone (2000-3000m)
In the temperate zone, you’ll rarely find roads. You’ll be on hiking trails most of the time that go along rivers, through thick forests, and into open pastures. The main plant life includes oaks, maples, magnolias, rhododendrons, etc., and you’re likely to encounter monkeys. Black bears and red pandas tend to stay far away from the main trails.
Sub-alpine zone (3000-4000m)
The tall, thick forest gradually transforms into small, spread-out shrubs at this altitude (plants like hemlock, fir, juniper, birch, rhododendrons, etc). The trail goes along open valleys, hillsides, and exposed ridges at this altitude. Overall, the landscape becomes drier and sees snowfall in winter.
Alpine zone (4000m+)
The Alpine zone consists of the driest tundra-like landscape with very little vegetation (mostly just grass, mosses and wildflowers). The trails here are mostly on hillsides, tall ridges, high viewpoints, and glacial moraines. During bad weather, this zone can easily become risky or impossible to traverse.
Hopefully, this gave you a general idea of the region’s geography. Next, let’s look at what each section of the route looks like for each trek - the most difficult parts, best parts, common dangers, and so on.
Langtang Valley Trail Condition
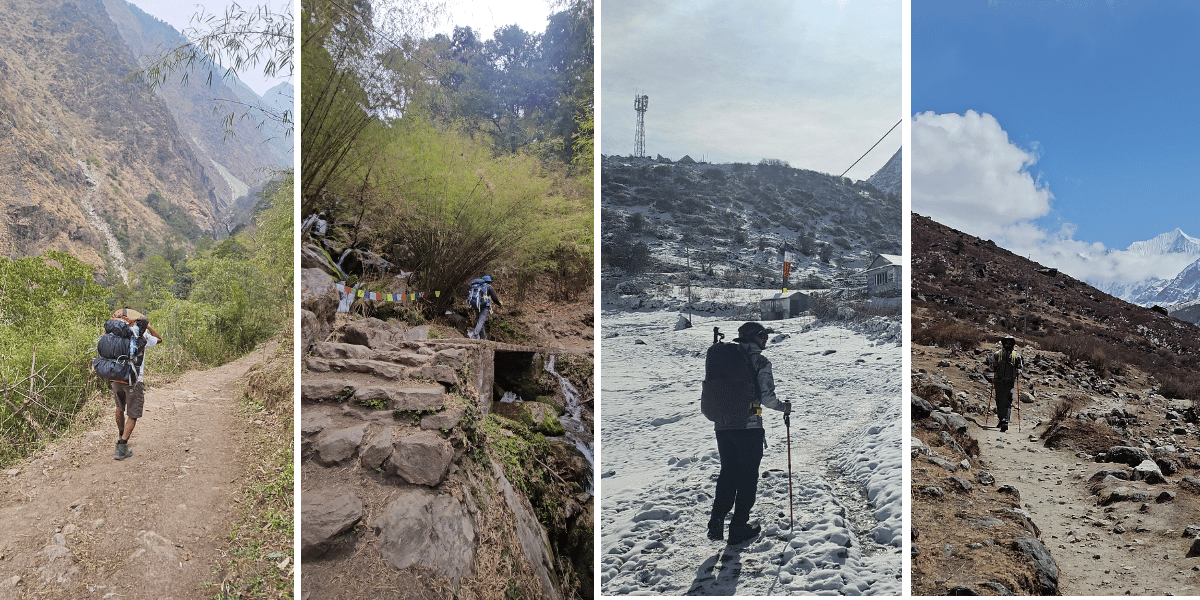
Syabrubesi > Tiwari > Domen > Pairo > Bamboo > Rimche
This is the first stretch of the trek. This part starts with a vehicle road till Domen; then you follow the Langtang river on a forest trail.
This section has a bunch of ups and downs and flats, but none are particularly difficult or dangerous. You do have to watch out for landslides during the wet season, though.
If you take the Sherpagaon high route, the initial stretch will be a bit longer/more difficult. But you’ll get better views and be better acclimatized. Ultimately, the trails converge at Rimche.
Rimche > Lama Hotel > Riverside > Woodland > Pering Kharka > Ghoda Tabela
You’ll walk through the most dense forest in this section of the trek, and that’s something you should take seriously. Most of the accidents and disappearances on this trek have occurred in this patch.
The thick forest means the highest chance of wildlife encounter. And if you’re trekking in wet/foggy/dark conditions, it’s easy to get lost or slip and injure yourself. Don’t walk solo here and don’t do this portion too late in the day.
Besides that, this isn’t a particularly difficult section. It’s a slow, continuous ascent till Pering Kharka. The treeline gives way to open pastures and you’ll have your first clear views of the mountains.
Ghoda Tabela > Thangshyap > Charting > Chyamki > Gumba > Langtang Village
The trail drastically changes in this section as the forest suddenly disappears and you start walking on an open hillside and valley.
You have no cover against the elements. So, you’ll feel warm very quickly when the sun is out. But you’ll also feel the wind, rain, and snow directly.
In terms of difficulty, this section has a steep uphill till Thangshyap. But the rest of the trail is a slow ascent; it shouldn’t be a problem for most people.
Langtang Village > Mundu > Sindhum > Kyanjin Gompa
This is often called the easiest and most beautiful part of the trek. It’s a very gentle ascent from Langtang to Kyanjin and the wide open valley allows for spectacular views of the peaks awaiting you. As you’re getting pretty high in altitude, this section CAN have deep snow during winter, though.
Kyanjin > Viewpoints
Kyanjin Gompa is sort of a basecamp for all the viewpoints and excursions in the area. The easiest is a short uphill hike to Lirung Glacial Lake. The viewpoint hikes to Kyanjin Ri (4,400 m) and Tserko Ri (4,985 m) require climbing steep hillside trails and ridges.
The trail to Langshisha Kharka is flat, but the trip takes the whole day. More remote exploration takes you to peaks, glaciers and high passes.
Overall, all the mainstream attractions can be done as a day trip - you explore the location and head back to your lodge in Kyanjin for the night.
Quick Tip: Check out our detailed Langtang packing list to prepare correctly for all seasons and conditions.
Tamang Heritage Trail Condition
Syabrubesi > Gatlang
Avoid the vehicle road when heading from Syabru to Goljung and take the steep uphill path. It may look tougher, but it’s much shorter. In 2-3 hours, you’ll reach the hilltop next to Goljung.
Rest easy as the remaining trail for the day is flat. Enjoy the views from this high vantage point and head into the thick forest trail. You’ll pass terraced fields and scattered settlements before you soon reach Gatlang.
Visit the nearby Parbati Kunda if you have time and energy in the afternoon. Or, feel free to leave it for next morning.
Gatlang > Tatopani
This section is a mix of uphills and downhills, vehicle roads, terraced fields, barren ridges and forested sections - a bit of everything really. Once in Tatopani, explore the village and consider visiting the hot springs to help with recovery.
If you’re a fast walker, you can even go up to Nagthali Danda for the night. It’s about 4.5 kms and 600 m of elevation gain.
Tatopani > Thuman
This section starts with a steep climb up to Nagthali, where you’ll get views of all the surrounding mountain ranges. Due to this, many people skip Taruche peak and head straight to Thuman. But I don’t recommend that.
The Taruche viewpoint is some 600 meters higher and provides a better panorama as well as views deep into Tibet. Yes, it's an extra few hours but the effort is worth visiting the best viewpoint of the trek.
Afterwards, it's a full descent through the forest and hillside to Thuman.
Thuman > Briddhim
From Thuman, it’s an easy downhill to the river. But sometimes, the bridge can be damaged due to bad weather and disasters. And finding an alternate crossing point can be tricky.
After the river crossing, it’s a simple uphill hike to Briddhim.
Briddhim > Lama Hotel
From Briddhim, the trail back to Syabrubesi is a simple downhill with very little to worry about.
But if you’re not ending the trek today and heading to Langtang Valley instead, you’ll head towards Sherpagaon. This involves a slow uphill through forests and hillsides.
The exposed hillside from Surka to Sherpagaon can be a bit risky during monsoon. You have to watch out for landslides as well as slipping and falling. So, trek carefully!
Gosainkunda Trail Condition
Dhunche > Chandanbari
The trek starts off with a pleasant forest section and a small waterfall. After that, it’s a continuous uphill journey. You’ll pass Deurali, Dhimsa, and some scattered houses before eventually reaching Chandanbari.
This stop has the best lodges on the route as well as attractions like Sing Gompa (monastery), a cheese factory, and fantastic mountain views. So, most trekkers stay the night here on Day 1.
Chandanbari > Gosainkunda
From Chandanbari, it’s a slow ascent to Cholangpati. There are no steep climbs, but the jungle is very thick in some parts. So, don’t trek this section in the dark.
After Cholangpati, the trees rapidly transform into shrubs. By the time you reach Lauri Binayak, even shrubs become hard to find. The upside is that there’s nothing covering your views on any side, so you get an incredible panorama during clear weather.
Lauribinayak to Buddha Mandir is a steep ridge climb, while the rest of the trek to Gosainkunda is a gentler ascent via a hillside trail.
Stay alert and trek carefully during rainy or snowy weather, as some sections are narrow with a sharp drop. The risky parts do have guardrails, though, so that helps.
Gosainkunda > Lauribina Pass
Gosainkunda and Bhairabkunda are right next to the hotels, so explore them at your leisure. If you’re going for a skinny dip, be extremely careful to not veer too far. The lake has very sharp drops that people don't expect, which has caused a lot of drowning incidents.
From Gosainkunda, it’s a couple of hours of gentle ascent to Suryakunda and Lauribina Pass.
Lauribina Pass > Kutumsang
Most people end the trek at Lauribina Pass and return back via the same route they used before.
But an alternative return method is to continue down the Lauribina Pass and go to:
- Phedi > Thadepati > Kutumsang OR,
- Phedi > Talu village
Both are easy downhill treks that are often quicker than the Dhunche route. And you also get to explore the beautiful Nuwakot and Sindhupalchowk districts of Nepal.
You’ll find local vehicles that go from here to Kathmandu. Or, you can trek all the way to Kathmandu via Chisapani > Sundarijal, whichever you prefer.
Helambu Trail Condition
Sundarijal > Gul Bhanjyang
The trek starts off with hiking through the rich dense forest of the Shivapuri National Park. At Chisapani, you’ll notice the impact of the 2015 Nepal earthquake.
The forest also starts to thin out at Chisapani. So, you’ll have your first proper mountain views here if the weather is clear.
After Chisapani, it’s a mix of vehicle roads, trekking trails, uphills, and downhills to Gul Bhanjyang.
Gul Bhanjyang > Thadepati
Past Gul Bhanjyang, the altitude begins to pick up with a constant uphill trail to Kutumsang > Mangingoth > Thadepati. It’s mostly a forest + ridge trail.
At Thadepati, the trail continues north to Gosainkunda. But that’s not the route to follow for the Helambu circuit. Head east instead towards the Helambu area.
Thadepati > Tarke Ghyang
As Thadepati is a high vantage point, you’ll see Ama Yangri and most of the route you’ll walk on next. Start with a steep 1700m descent down to the Melamchi river. You’ll cross the river and climb up to Tarke Ghyang, passing villages and terraced fields on your way.
Tarke Ghyang > Ama Yangri
Tarke Ghyang is the last proper village on the route to Ama Yangri. So, the climb up to Ama Yangri base camp is often quiet.
The base camp has a few hotels in case you want to stay the night here. The section from the base camp to Ama Yangri is a very simple uphill on a forest + stairs trail.
Ama Yangri > Sermathang
Ama Chhumo Yangri peak is one of the best viewpoints in the Langtang region (popular for mountain views, sunrise, sunset, and sea of clouds). Enjoy the view and make a slow descent along forest and hillside trails to Sermathang.
You’ll pass villages like Gangyul and Chhimi on your way there. After Sermathang, you’ll continue heading downhill to Melamchi, where you’ll end the trek and head back to Kathmandu.
Panchpokhari Trail Condition

Chhimti > Tuppi Danda
At the start, you’ll cross a beautiful suspension bridge and come across an artificial waterfall.
To reach Deurali, you can take the stairs (direct but steep) or take the vehicle road (easier but much longer). I recommend the stairs.
You’ll notice villagers farming and living their typical life as you trek past Deurali. Shortly after, you’ll reach Dukhang Kharka.
Check in to the national park checkpost here and continue on the uphill forest trail to reach Tuppi Danda.
Tuppi Danda > Nosyampati
Tuppi Danda to Tangu Khola is a slow ascent. But once you cross the river via the suspension bridge, the climb up to Ratmate danda is very steep.
The remaining climb to Chokar Danda > Tap Kharka is a bit more manageable.
After Tap Kharka, the forest starts to thin out and the trek to Nosyampati becomes easier as it’s not as steep as before.
Nosyampati > Panchpokhari
Nosyampati to Panchpokhari is a remote hillside trail with no settlements in between. It typically takes 4+ hours.
As some sections are very narrow and angled, trek carefully during monsoon and winter. The danger of slipping off the cliff is real here! Peak winter also tends to make this section unusable due to deep snow.
Panchpokhari > Viewpoint and Further
The area around the Panchpokhari lakes is a flat basin of sorts, so it’s easy to explore all the lakes.
The climb up to the viewpoint isn’t particularly tough either, as it’s only 200 meters higher (in altitude). Trekkers in good condition prefer to rest overnight at the viewpoint to enjoy the lake + mountain view along with the night sky.
There are no common dangers to worry about with either of these locations. But if you’re continuing further towards Tilman pass, then definitely be well prepared. That route is remote and dangerous (chance of accidents, getting lost).
Jugal Himal Trail Condition
Tembathang > Chhendang
To start off, you’ll follow the Bhotekoshi river upstream to Dipu. One path splits off across the river and climbs up to Panchpokhari. Ignore it and continue following the river north to Chhendang.
Chhendang > Ne Pemachal
From Chhendang, head east along the river gorge passing Nimala, Chachung Kharka, and Gangzi Khola to reach Tongshyup cave.
This place is meant to be a shelter, but you should continue heading east, as Ne Pemachal is just a bit further.
Ne Pemachal > Jugal View Point
After Ne Pemachal, the landscape really begins to open up (especially since you’re climbing straight up).
The initial climb to Bumba Serpu is on stairs/hillside. It’s generally manageable and you’ll get some great views.
The final climb up to Jugal View point often has a lot of snow, which can make it difficult to find the trail. But assuming you get there, you’ll have the best views of the area, including the Jugal range, nearby valleys, forests, and glaciers.
Ruby Valley Trail Condition
Syabrubesi > Gatlang
This section overlaps with the Tamang Heritage trail. So, once again, you’ll have an uphill trek to Goljung, then a flatter section till Gatlang.
Gatlang > Somdang
Right out of Gatlang, you’ll come across Parbati Kunda (a small holy lake).
As you pass scattered settlements, you’ll soon reach Jyarsagothen Community Forest, where you’ll notice over 500 hectares of forest destroyed by wildfires.
After crossing the forest, you’ll reach a 3,700 m ridge, one of the highest points for this trek. The rest is a simple downhill walk to Somdang.
Somdang > Tipling
This is a very straightforward route, but not an easy one. First you’ll make the diagonal climb up to Pangsang pass, the highest point of the trek.
If you have enough time and energy, you can explore Mhar Syong as a side trip. It's especially beautiful in spring and summer when the grazing fields become vibrant green.
The final stretch is a simple downhill walk to Labdung > Tipling.
Tipling > Darkha Gaon
After Tipling, it’s a continuous downhill via lush green hillsides. You’ll pass traditional villages like Sertung, Borang, and Jharlang and end the day’s trek at Darkha Gaon or Darkha Phedi.


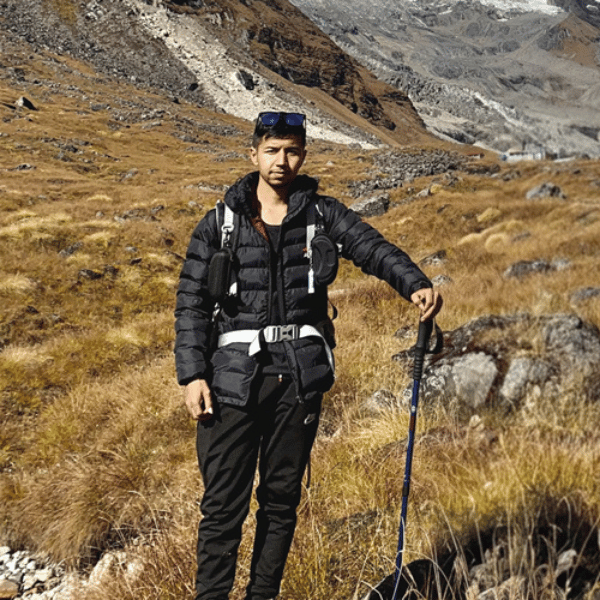 Anup Thapa